Additionally, we are actively working on a video user manual.
This is published to youtube, subscribe to isla instruments on youtube to be notified, playlist link here: S2400 Video user manual playlist
NOT criticism as we know this is v1 and out to get it out so we can read and that i appreciate but as we are open for discourse here we go, now i am sure this is already known and piped for v2 manual and beyond but:
i think it needs some steady formatting, some images to back up certain focus points would help users i am sure
some bulleting and paragraphing to make it easier to absorb
on the connections page the i/o labelling so people know what to expect, most of us are fine but every manual out there covers the basic connections and their capabilities
i know elektron are sometimes a touchy subject but there manuals are bloody good, well worth plagurising a little hehee
will get to more as i read through again
hard to say too much regards any tech errors as i am looking only as a book reader right now, not an owner yet sadly i wait for the boat which is all good btw - gives me a 2021 to look forward to
Yeah I long ago sold on my elektron gear but their manuals really are ace. Fortunately the s2400 isn’t layers deep in the screen or knob pushes but visual cues and step by step processes are welcome. I’ve been very happy with Sunshine Jones “Missing Manuals” for the boutiques.
Would be nice if you fix this when updating the manual next time:
On page 12, “See the MIDI Mapping section for more details.” link jumps to “Live Looping” on page 27 instead of “MIDI Mapping” on page 39.
I have experience with writing reports, procedure manuals, and other technical documentation. User manuals need to be written in a manner that can be consumable to the average person (e.g., pictures, bullet points, 8th-grade level content).
p. 15 top of page
Fader Modes
The row of buttons on the left (Level, Pitch, Envelope, and Loop/Slice) set the fader modem that
is, which parameter the faders control. The key is illuminated to indicate the current mode.
Changing a parameter value will affect the sound when a pad is pressed and when the track is
recorded. All of a track
Suggest change to:
Fader Modes
The row of buttons on the left (Level, Pitch, Envelope, and Loop/Slice) set the fader mode,
the special parameter the faders will now control. The button is illuminated to indicate the current mode. Changing a parameter value will affect the sound when a pad is pressed and when the track is recorded. You can change the parameter per pad or on all eight.
Envelope Fader Mode
Every track has two HiFi envelopes, and, optionally, a Classic volume envelope. The type of
volume envelope for a track can be set in track settings (Shift+Pad), or in Track Envelope
Suggest insert this firs After the heading and before the existing text:
The first thing you need to understand is that sampler envelopes cover a percentage or portion of your wave file’s total length. This is not the same as a synthesizer’s ADSR which is a measure of flexible time if your VCO is permanently “on.” The length of your wave file is fixed, although you can loop envelopes and replay the file. Time-stretching is another trick to make a wave file longer and may appear in an update.
In this section you will now begin to learn how to use the A & B buttons above the faders.
1st appearance Fader 6 below 1-6,
change fader # to 7.
1st appearance Fader 7
change fader # to 8
second sentence same line change course to coarse
Knob 6 and Knob 7 confusing. redundant/cut?
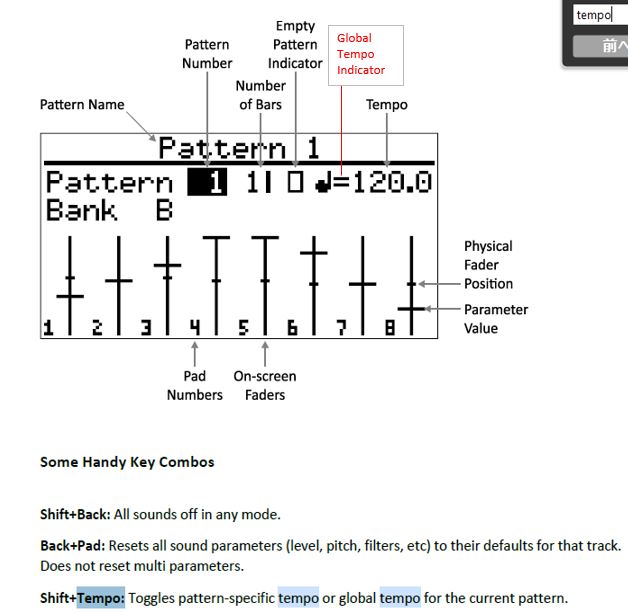
Next time the manual is edited, it would be nice if you could add an arrow pointing the “global tempo indicator”. Until now I’ve only used machines with the opposite behavior (no global setting, only pattern specific) and it took me a couple of minutes to understand the difference between the tempo icon with 2 horizontal bars and the one with 3 bars.
Just a very small detail but it could help other users who read the manual.
That Global tempo Indicator has had me puzzled ever since I received my unit. I only figured it out yesterday when I was implementing an individual pattern tempo.
I suppose not everyone knows how the analog filter circuitry works in the Classic machine.
So for example in the “Dynamic Filters” section adding that it is a low pass filter with a maximum frequency of 13khz
In the fixed filters that it is low pass filters as well.
And adding a note about the fact that by design it can’t be heard via the headphones output (if I’m not mistaken) could help too.
Another suggestion to remove something that is (a big?) source of confusion on the Internet:
Modifying the following data may help:
-on page 13 in “Optimal sample format” adding a note saying that sampling is done at 16 or 12 bit and adding a link towards sample mode (p48)
-on page 48 bringing the “Source” paragraph on top. In my opinion it is the most important information on this page.
-on the website rewriting the Sampler / audio paragraph. I suppose this would be Brad’s decision and I suppose this is the main source of confusion. I think making things clear is good for the next buyers/ users.
I seem to find myself reading about all the functions, but most of the time when I get to any given section, it tells me what the function does but is lacking the key commands to make it happen. “Waveform editor” and “Normalize” here for example. It’s not clear how to get to the waveform nor how to normalize the sample once you’re there.
If these were listed just to the right of all the various the functions, maybe in a dark gray vs black, it would be hugely helpful